Using the Oxford VPN in Mac OS X
Oxford University offers a “Virtual Private Network” service to its students, faculty, and staff. The most common reason people need to use this service is to get access to the wider internet using the Oxford Wirless LAN service. In fact, in almost all places where the OWL wireless network is available, the eduroam network is also available. Eduroam is a UK-wide network available at most major universities in the country and it does not require use of any special VPN, so I highly recommend that anyone new to Oxford take the trouble to configure their computers for eduroam instead of OWL. (The lesson, I’m afraid, is that IT services are better when they are not designed by the IT staff at Oxford.)
While the VPN is not necessary for wireless access, it may be required to access some Oxford-only services. The university encourages users to install a preconfigured version of the proprietary Cisco VPN client software onto their machines in order to do so. This is easy to do and does work, but I don’t really like it because:
- It requires installing software distributed by the university. This is a (minor) security concern, because if an attacker compromises the university’s system they can inject malware into the software distribution. I prefer to install only software than I retrieve independently directly from well-known primary sources.
- It requires non-standard system extensions which might cause reliability or performance problems. (I.e. it’s not just an application and can change the way the system functions even when it’s not running.)
- The Mac version, at least, is lousy software. The interface is ugly and it interacts with other programs in an obnoxious way (making itself the frontmost application without user intervention). These aren’t major problems, but they suggest little understanding of the Mac platform and shoddy engineering throughout the software. The VPN client asks to save user passwords, but does not appear to use the standard “Keychain” system, for example—it’s thus likely the password in stored on disk either in the clear (which would be a major security violation) or using some obfuscation which is trivial to undo (also poor security policy).
Under Mac OS X 10.6 (Snow Leopard), and possibly earlier versions, there is no need to install Cisco’s proprietary client: the operating system includes built-in support for Cisco VPNs. To set up the Oxford VPN, you’ll need to first collect the following pieces of information:
- Your remote access username. This should be the same as your single sign-on username, which begins with a few letters to identify your college or department and ends with a few digits. (At least, that’s what mine looks like.)
- Your remote access password. Most people set this to be the same as their single sign-on password when they initially register, but when you change your single sign-on password your remote access password does not change. (Another sign of what happens when you leave systems to Oxford’s IT staff.)
- The Oxford VPN “Shared Secret”. This is the same for everyone at Oxford, but it’s not supposed to be publicly available so I will not post it here. You can get it from the OUCS configuration file here, or you can get in touch with me directly.
Once you’ve gathered that information, select “System Preferences…” from the Apple menu and click on “Network” in the “Internet & Wireless” section. You should see something like this:
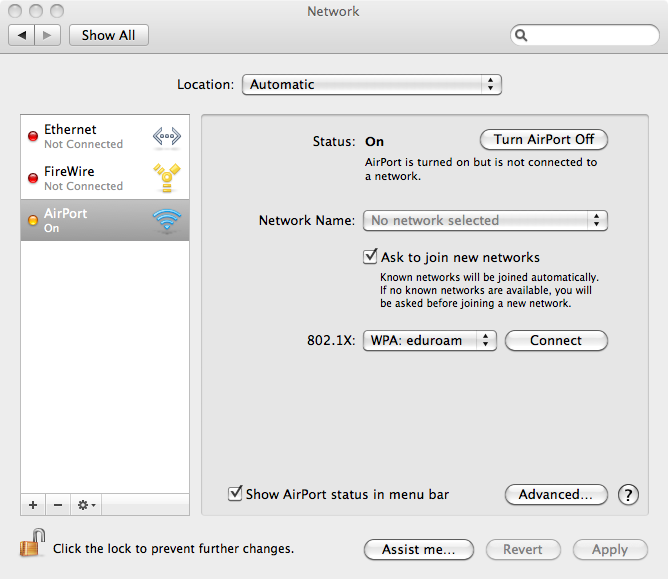
If the padlock icon in the lower left corner is locked, then click on it and provide your password to unlock the preference panel.
Click on the “+” button just above the padlock to add a new type of network interface. Choose “VPN” as the interface type, and then select “Cisco IPSec” in the VPN Type menu which appears. You can name the network whatever you want; I call it “Oxford VPN”.
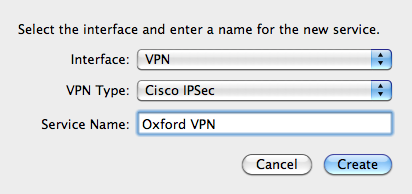
Click on the “Create” button, and the new interface will appear in the list at the left of the window. Select the new VPN and fill in vpn.ox.ac.uk for the “Server Address”, your remote access username for “Account Name”, and your remote access password for “Password”. The easiest way to manage the VPN connection is using a menubar widget, so I tick the “Show VPN status in menu bar” box:
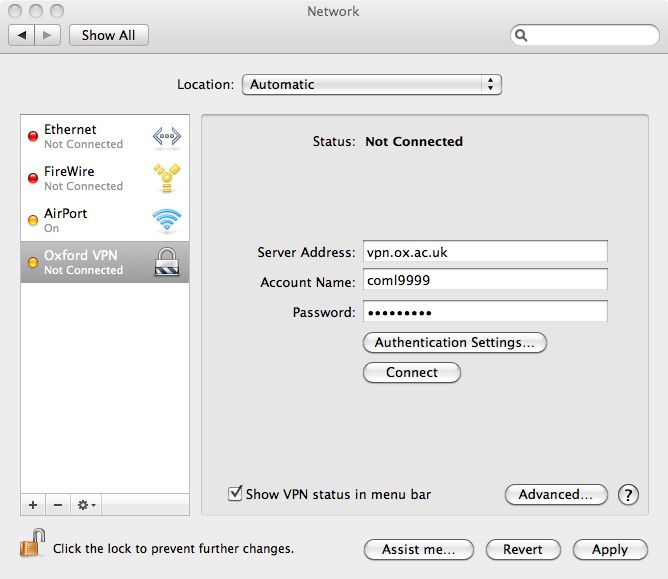
Finally, click on the “Authentication Settings…” button. The “Group Name” for the VPN is “oxford”; enter the “Shared Secret” as defined above.
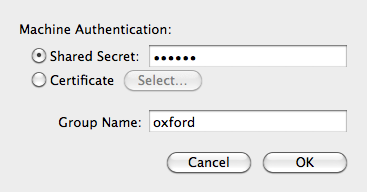
Click “OK” on the Machine Authentication panel, and then “Apply” at the bottom right of the Network preference window. Click on “Connect” (or choose “Connect Oxford VPN” from the new VPN menu in the menubar) to test the configuration.
Now, whenever you are on a network anywhere in the world you can simply connect to the Oxford VPN to get full access to university resources, as though you were plugged into an ethernet cable in your department or college.